Monday, August 4, 2014
Follow my blog with Bloglovin
Tuesday, March 18, 2014
ASP Nail Art Brush Set & Cutting Your Own Brushes
As Always, a HUGE thank you to Robin Moses who taught us how to create the tools we need from the tools readily available to us. Luckily, we wont have to cut our brushes much longer. Robin Moses is putting out her own brush set in the (hopefully) near future. I cannot wait. I Will be so excited when they finally are available.
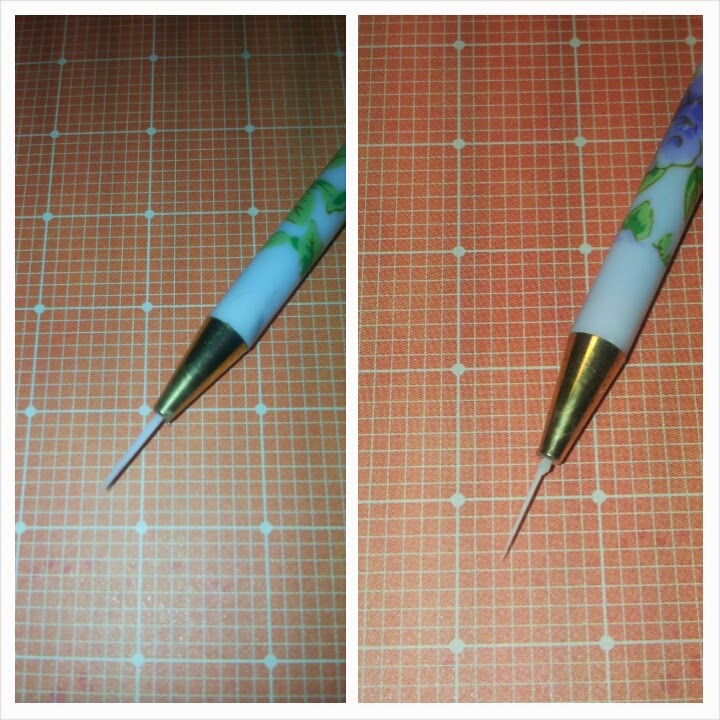
I was so scared to cut these brushes down. This pack of brushes run $14/$15, regular price. I was worried if I didn't cut them right, They would be ruined and I hated to pay that much for them the first time, much less if I had ruined them and had to buy a second set. I was so nervous cutting those tiny hairs out. But I am SO glad I finally did it, they are so perfect now. I wasn't able to use the striping brush before, it was too thick. And I just don't understand why these nail companies continue to make these "Nail Art" brushes so thick. You would think that since they are in the nail business that they would understand how valuable tiny brushes would be to nail artists.
After I saw how great the striping brush performed once it was cut, I got brave and Web ahead and cut the liner and mini liner brushes as well. I am so glad that I finally got the nerve to cut them.
Now I'm really ready to do some nail art. And Its perfect timing, I have decided to participate in a few of the upcoming Nail Art Challenges in April.
The ASP Nail Art Brush Set is sold at Sally's Beauty Supply for $13.99. This set includes a Striping Brush, Nail Art Brush (Flat), Liner Brush and Mini-Liner Brush. Thru the Month of March, this set is on sale for $10.99.
I definitely recommend cutting all of them down, except the flat brush. The flat brush is great for one-stroke technique painting and works fine the way it comes.
I have included a picture of the set from Sally's website, as well as one of the 3 brushes together before I cut them down and a side by side, before and after shot of each of the 3 I cut down. Please forgive me for all the photos being together at the end of the post. I still have not figured out how to integrate the photos throughout the post on this damn crazy phone.
As always, thanks so much for stopping by. Please follow my blog. I'm working hard on making sure my posts are more regular and have some fun posts coming up in the near future. Leave me a comment. I would love to hear some feedback.
Do you cut your brushes down? What brand of brushes have worked best for you? Are you participating in any Nail Art Challenges? If you know of any really bad ass challenges, I would love to know about them.


Monday, March 17, 2014
Haul Post Fail........
When I decided to do a Haul Post, I had so many ideas about the way I wanted to do it. But I just cant seem to get this done. I have so many ideas for posts, but I can't get past this one.
On top of trying to find time to do my post around my new work schedule, I got a new phone last week and that has severely complicated things. Unfortunately, my phone is my main internet access at the moment. I have had an iphone for almost 5 years now, I did everything from my phone. Switching to Android is a huge deal for me. I am having to re-learn how to do EVERYTHING.... It is incredibly frustrating to put it mildly. And the Blogger App works way differently.
So, bear with me, I Will get it figured out and there Will be some Nail Art coming soon. I'm narrowing down some challenges to participate in and Im looking so forward to participating.
For now, I do have some photos of my Haul Stash. I apologize, this is not at all how I wanted to do this post. Im sorry for not listing the names of the polishes. If you would like to know the name of a cetrain polish(es), comment below and I will get back to you with the name or info requested. I Will be doing some reviews and swatches focusing on certain polishes that really intrigued me.
I just figured out how to get photos to post on this Damn app, so Im sorry for them all being piled on at the end. I am trying to figure out how to integrate em into the post.
Thanks for stopping by. I Will have some Nail Art up soon, I promise.


Sunday, March 9, 2014
Overview of Great Deals - Part One of Huge Multi-Post Haul
Now that I am working regularly, I have actually been able to pick up a few polishes here & there. There's also been some Super Awesome sales going on in the past month as well. Yesterday, after picking up the most awesome matte glitter polish ever, I was really feeling the need to share my awesome find. So I decided I was going to do my first Haul post.
As I was gathering all the polishes that I have picked up in the past 3 weeks together to begin drafting my post, I quickly realized that I was going to have to reaccess this idea and approch this Haul in several seperate, Smaller posts. The final count was 57. Lol. Before passing judgment, keep in mind all the amazing sales I caught:
First, there was the always much anticipated Sinful Colors 99 cent sale at Walgreens a couple weeks ago. (That one is definitely my weakness, I LOVE Sinful Colors) I have more SC polishes than any other brand. Last count was over 170. (Several months ago) Lol.
This past week at Walgreens, all Wet N Wild - Wild Shine polishes were 69 cents, and the new Spring Collection just came out.
My Wal Mart has a display of the new collection of Maybelline polishes and lipsticks wih a pad of coupons attached. The coupon is for $2 off when you buy any 2 polishes, lip products or eye products. Maybelline Color Show polishes are also a weakness, the are wonderful.
Next up is the China Glaze - Buy One Get One Free Sale going on thru the entire month of March at Sally's Beauty. Need I say anything more? Lol.. And of course I cant leave without Carefully examining every bottle on the Clearance Rack, as I already have almost every one on it, but its a compulsion. And it Never fails, I always end up getting home to find out that I already have at least one I picked up off the clearance rack & have to make a trip back just to exchange it. (Unless its actually worth having a back up of in my stash)
I then stumbled upon a treasure trove a.k.a the Clearance Bins at Rite Aide. I Love their Clearance, I always find such unique polishes. There are several brands that I have acquired a collection of that I otherwise would not own cuz I will not pay the ridiculous full prices for them.
The first week of my new job, one of the warehouse guys came to my desk and brought me a hot pink metallic Broadway polish and asked if it was mine. I told him no and he said well, just keep it cuz we don't have any use for it back here. So I have been trying to remember to look for them at Dollar General, regular price -$1.00. So I had to pick up several to do a little review on. They are a relatively new brand.
Finally, I stopped in Big Lots this evening specifically to check out the nail polish aisle. They had Revlon Colorstay for $1.50 and Sephora by OPI for $1.80. I dont own any Sephora by OPI polishes, so I was super happy to find those at that price.
I think that about covers Part One of my Multi Post Haul. Now to decide how to seperate the actual Haul. By Brand.. or by Store... or by Sale.. How would you split it up???
Keep an eye out for Part 2 and Part 3 which will contain the actual Haul. I can't wait to share all my awesome finds with everyone
Thanks for stopping by my tiny corner of the Nail Art World.
Have you taken advantage of any of these awesome sales?
Don't forget, the China Glaze BOGO Free Sale at Sally's Beauty is active thru tne entire month of March.
Saturday, March 8, 2014
Blog Update, Life Update, Mani of the Day: Maybelline Street Art & Sally Hansen Insta-Dri Clearly Quick
Sorry for the disappearing act the past few weeks. I started a new job about 3 weeks ago and went from working 4 hour shifts maybe 3 days a week to working 10 hours a day, 6 days a week. And on top of that, its an hour driive to and from work now. Ive been so exhausted. I usually pass out within 30 minutes of getting home each night. I had the same design on my nails for 3 weeks and it has been driving me crazy. I finally made myself stay awake long enough Wednesday night to at least take the polish off. Lol. I had to just grab a few random polishes to bring with me to work yesterday to throw something on them. It is driving me crazy to be too tired to work on any designs.
I've included a shot of my current mani. It's pretty boring, but didn't have much time to do much else. I just needed something to tide me over till I can do something better Sunday. Sorry for the aweful quality of the photo. I'm doing this post from my phone instead of putting it off till Sunday when I can sit down at my computer.


Saturday, February 8, 2014
"Mixed Media" Nails (For Lack of a Better Title)

This design was a lot of fun because of all the different techniques it involves, all tied together in one design. I used Striping Tape, Foils, Acrylic Paints, a Dotting Tool, Matte Top Coat and a Chunky Glitter Polish.
I again used several Sinful Colors polishes in this design. Sinful Colors has become my absolute favorite polish brand. I have more of this brand than any other in my collection. Last I checked, I was up to 170 Sinful Colors. They are such great polishes for the price.
Supplies Used:
Wet N Wild - Wild Shine - A Blank CanvasSinful Colors - Whipped (Matte)
Sinful Colors - Savage (Matte)
Sinful Colors - Dream On (Matte)
Salon Perfect Matte FX Top Coat
Orly - Peaceful Opposition
Apple Barrel Acrylic Paint - Canary Yellow
Americana Acrylic Paint - Tangelo Orange
Apple Barrel Acrylic Paint - Black
Apple Barrel Acrylic Paint - White
Folk Art Acrylic Paint - Bright Green
Apple Barrel Acrylic Paint - Lime Sorbet
Striping Tape
Dotting Tool
ASP Nail Art Brush - Mini Liner Brush (4 Pack Brush Set)
Ciate Foil Fix Glue
Ciate Very Colourful Manicure Foil - Flash (Holographic Silver)

The colors of the polishes are a bit off in this photo. Savage is really a beautiful bright teal green and Dream On is a super bright neon purple. Both have a matte finish. Orly - Peaceful Opposition is absent in this photo. The day it was taken, I had forgotten it at another location. But lucky me, I had chosen that polish to include in the original photo of the design, so it wasn't really left out after all. Peaceful Opposition is such a cool polish. It has large silver square glitter in a milky white base. I think it is very unique.
For months I have been trying to figure out a way to neatly store my striping tapes, preferably on some sort of bar or roll, I have about 30 rolls. After months of searching for storage ideas, I came across a video on YouTube that made me feel like an idiot. (I'm sorry, I have no idea who's video it was) I had never thought to put them in a scotch tape dispenser. Duh.... Lol... It only serves to store them, you will still need scissors or nippers to cut the striping tape, as the teeth on the scotch tape dispenser will not cut the thin strips of tape, they fit between the teeth of the dispenser. The plastic tape packaging I purchased held about 7 rolls of striping tape per dispenser. I felt so stupid that I hadn't thought of using the tape dispenser for striping tape, the most obvious solution.
The Design:

Thumbs - Glossy White / Matte Black Stripes: I started with 2 coats of a glossy white polish, Wet N Wild - Wild Shine - A Blank Canvas. Once the white polish was fully dried, I applied several pieces of Striping Tape down each thumb to form vertical stripes. I then applied 2 coats of a matte black polish, Sinful Colors - Whipped, then removed the tape to reveal the glossy white stripes beneath.
Index - Polka Dots: I applied 2 coats of a bright Teal Green polish, Sinful Colors - Savage, and allowed it to dry. I then applied dots using a dotting tool and Orange Acrylic Paint. Once the Orange dots were dry, I applied smaller dots inside of the Orange dots, using the smaller end of the dotting tool and Yellow Acrylic Paint. Once the entire nail was dry, I applied Salon Perfect Matte FX Top Coat over the design.
Middle - Foiled Cross: I applied 2 coats of a bright Neon Purple polish, Sinful Colors - Dream On. Once the nail was dry, I painted a Cross in the middle of the nail with Black Acrylic Paint and an ASP Mini Liner Brush. Once the paint dried, I used an old, thin paintbrush to apply Ciate Foil Fix foil glue around the outside of the Cross. Once the Foil Fix sat for a few minutes, became tacky and turned clear, I applied Ciate Holographic Silver Foil in Flash to the tacky Foil Fix, outlining the Cross in Foil.
Ring - Matte Roses: I began with 2 coats of a matte black polish, Sinful Colors - Whipped. Then with my ASP Mini Liner Brush, I applied small blobs of a bright Neon Purple polish, Sinful Colors - Dream On, throughout the nail. Once the blobs dried, I went in with White Acrylic Paint to create the Rose detail highlights. Then with Bright Green Acrylic Paint, created leaves and highlighted them with a Pastel Lime Green Acrylic Paint. Once the design had fully dried, I applied Salon Perfect Matte FX Top Coat.
Pinky - Chunky Glitter: I applied 2 coats of a bright Teal Green polish, Sinful Colors - Savage. Once dry, I applied a thick coat of Orly - Peaceful Opposition as a layering Glitter.
Thanks for checking out my design. I used several different formats for today's post. I am just trying to figure out this whole blog thing, so please bear with me as I find my "groove" and figure out my own writing style. Thanks again.
Saturday, February 1, 2014
Sinful Colors - Matte Roses Nail Art
Just a quick post this morning of a single nail practice design that I did several months ago. I have photos of tons of quick, simple, one nail designs I have done for practice.

Please forgive the quality of the photo. It was one of many quick snapshots I used to take of my designs from my iPhone. When taking them, it was never my intention to publish them anywhere or I would have taken more care when photographing them. It seems these photos show every flaw that you don't even notice until you start editing. In hindsight, I sure wish I had cleaned up the "cuticle area" of the practice hand before taking the photo.
Originally, I planned to make this tip into a necklace as a gift for a friend. I still haven't followed through with attaching the hardware to it. Hopefully, I will find time to get to it eventually.
Supplies Used:
Nail Tip applied to a Practice HandDotting Tool
Sinful Colors - Whipped (Matte)
Sinful Colors - Hazard
Salon Perfect - Matte FX Top Coat
Apple Barrel Acrylic Paint - Black
Apple Barrel Acrylic Paint - White
Apple Barrel Acrylic Paint - Lime Sorbet
Folk Art Acrylic Paint - Bright Green

Original Tutorial:
I originally saw this technique in a tutorial done by Lisa of Nail Art 101.
The link to her original post featuring the tutorial I got the idea from: http://www.nail-art-101.com/floral_nail_art.html. Please go check out her site, there is so much awesome information on it. I love her tutorials. I have learned a lot from them.
Her tutorial I learned this technique from is below.

Thanks for checking out my posts. I hope you are inspired to try something new.
Wednesday, January 29, 2014
See You on the Dark Side of the Moon - Pink Floyd Nail Art

Dark Side of the Moon was something special between my nephew and my Daddy, who we lost to cancer in May 2012. I knew it would be the perfect design to do for him. I used an adhesive hook as a stand to work on while painting the design. I use a cut brush, technique learned from Robin Moses.


Background: Sinful Colors - Whipped (Matte)
Detail Work: ACRYLIC PAINTS: (All paints are Apple Barrel unless otherwise stated)
Black, White, Pewter Gray, Key West, Bright Blue, Admiral Blue, Flamenco Red, Red Apple,
Jack O'Lantern, Sunny Day, Canary Yellow, Holly Branch, Purple Iris, Folk Art - Bright Green,
Americana - Tangelo Orange.
Shimmer Effect inside Prism:
Ciate Foil Glue
Silver NYX Eyeshadow (I can't recall exactly which one I used)
Top Coat: Seche Vite

It took me forever to figure out how to display the piece for him. I finally ran across a tiny magnetic frame that I had picked up at a dollar store and it was the perfect size. Originally, it was bright lime green, so I painted it black with acrylic paint and used a cheap top coat over it. I used scrapbook paper as a background and included a few music note confetti that were actually from my Daddy's last birthday, a few days before he passed away. I then inserted the plastic piece into the frame and glued the nail to the front using nail glue. I also added a few black rhinestones, one in each corner, so it would dress it up a little without being too "girly". I was very happy with the way it turned out,

I'm going to end this post with a picture of my Daddy who this design was done in memory of. I hope you like the design. Thanks for checking it out.

Thursday, January 23, 2014
Welcome to My Nail Art Adventure
Welcome to my Blog! This is something I have been wanting to do for several months now. I have put it off & put it off for a while now with so many excuses. But it is now time to either start writing or forget about it. If I wait until I am "Ready", it will never happen.
I guess first off I should let you know a little bit about me. My name is Rhiannon. (RYE-ANN-ON NOT Ree-Ann-on and NOT Ree-Anna). I am 33 years old. I live with my wonderful, supportive boyfriend and our beautiful Boston Terrier, Idgit.

I have been obsessed with makeup ever since I was a child. Wearing bright, wild colors created many issues for me while growing up (and being an adult) in a very small town. But I never changed who I was. I have always painted my nails and according to friends, had a pretty large polish collection.
(If they could only see what it has now become.) But, I have never really been too "into" Nails like
I have always been "into" makeup. I have also been an artist my whole life - Drawing & Painting.
Nine months ago, we moved to a new city where we didn't know anyone else. During that time, I developed a love for nail polish, nail art, pretty much anything to do with nails period. My stash grew quickly. I have acquired many supplies and equipment during this time. To the point it looks like a nail salon in my living room. Thankfully, my boyfriend is very supportive and doesn't complain.
In addition to Nail Art Supplies, I also acquired a collection of textbooks/educational books and basic supplies for acrylic nails, UV Gel nails, etc. This has become a hobby that I do something with Every day without fail.
When I would get new polishes, I found myself hitting the Internet to find out more about the brand and collections. That is how I discovered the wide world of nail blogs. I was fascinated to read other nail bloggers and see swatches of polishes and nail art. Being in this new place with a new hobby and not having any one to talk to about it made me think about starting this blog. I know my boyfriend gets tired of hearing about it and looking at polish, new nail art designs and my progress learning acrylics and gels. Even tho he is always very sweet about it.
Not knowing anything about blogging, I set out to learn all I could before actually starting to post anything. I started researching how to start a nail blog. I thankfully found many helpful bloggers who have written very informative posts. Without them, I probably would not be writing this now. I would like to shout out a HUGE thank you to the following Bloggers, these posts linked below have made it possible for me to start this project:
Vampy Varnish: How to Start a Nail Polish Blog Part I
Vampy Varnish: How to Start a Nail Polish Blog - Part II
Vampy Varnish: Tips & Tricks of Beauty Blogging
Nails by Kayla Shevonne: How to Start and/or Grow Your Nail Polish Blog
The Nailasaurus: How to Get Ahead in Nail Blogging
The Nailasaurus: Oh Snap: How I Take My Pictures
Chalkboard Nails: Nail Photography Basics (Part I)
Chalkboard Nails: Intermediate Nail Photography: The Light Box (Tutorial)
Will Paint Nails for Food: The Beginner Blogger's Bootcamp: Kickstart You Nail Polish Blog *
* This Link is to the first of 10 posts in this amazing series.
I can only hope to have a Blog half as good as any of them. Maybe they will stumble across my blog one day. I am still trying to figure this whole thing out, so please bear with me as I learn how to use Blogger, learn how to blog period, learn how to take decent photos, and learn more nail art techniques. I started Rye's Nail Art Experience on a Facebook Page before I started posting here because I was comfortable with using Facebook. Hopefully I will get this whole Blogger thing down in time.
I have also been learning so much from YouTube that it is unbelievable. I discovered Robin Moses early into my nail art adventure and she has been such an inspiration. I have learned so much from her. Her work is AMAZING!!! Truly, in everything I do now, I am inspired by Robin Moses.
If you have never seen her videos, you MUST check them out. This is the video that started it all, once I saw this, I was hooked.
To end my first post, I thought I would share a photo of my little assistant, my sweet puppy Idgit. She is our baby. Thank God she is such a good puppy and does not get into any of my nail supplies.

I am so sorry for such a lengthy first post. Thanks so much for reading. Hope you follow me and stick around for my Nail Art Adventure to come.